Tools for anatomical evaluation in Skeleton·ID
After making a correct superimposition in the skull-face overlap scene  , Skeleton·ID has a series of tools for evaluating the skull-face anatomical and morphological consistency.
Skull parameters
- Tools for changing opacity, by means of which the degree of transparency of the skull is regulated; and a wipe tool, which will allow us to make a sweep to hide part of the skull. These tools allow the evaluation of the morphological correspondence and the position of the anatomical structures.

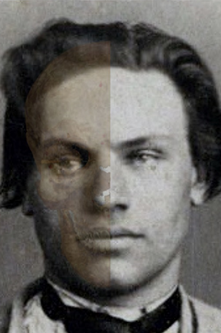

Figure 1. Skull parameters (left), skull-face overlay with applied transparency (center), and with applied wipe (right).
Soft tissue data visualization
t tissue data visualization Visualization of soft tissue data through cones. The size of this cone will be determined by the defined soft tissue study and it consists of three regions at the cone: in red the soft tissue distances less than those that can be seen in the soft tissue study are displayed, in yellow the data from the study would be above than three times the mean plus the standard deviation and below the mean minus three times the standard deviation. Finally, in green are the soft tissue thicknesses between the mean ± the standard deviation. To activate this option, simply select the “Cone” option in the landmarks mode option of the “Landmarks Configuration” (Figure 2).


Figure 2. Landmark settings (left). Landmarks mode selector (right).
Create an evaluation set of anatomical matching criteria
Skeleton·ID has an “evaluation” tab in the skull-face overlay scene in which the criteria of anatomical correspondence that have been evaluated in the overlay can be noted. This tool allows you to have a record of the annotated evaluations, which can later be automatically transferred to a report.
- To carry out the evaluations, you must select the “evaluation” tab.
 Figure 3. Tabs available in the skull-face overlay scene.
- Subsequently, click on to create a “new evaluation set” option
 and a window will be displayed where we must enter the data corresponding to our set. By default, the available criteria set is Skeleton·ID.
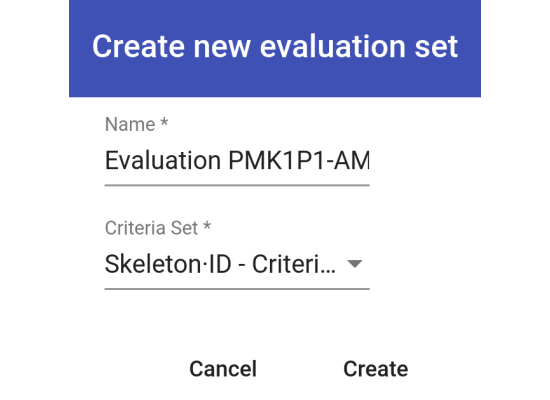 Figure 4. Evaluation set creation options.
- Once the evaluation set has been created, we can select any of the 4 families of criteria available by default in Skeleton-ID: 1) Asymmetries; 2) Consistency of craniofacial morphological curves or outlines; 3) Consistency of anatomical position relationship; and 4) Consistency of soft tissue thickness.
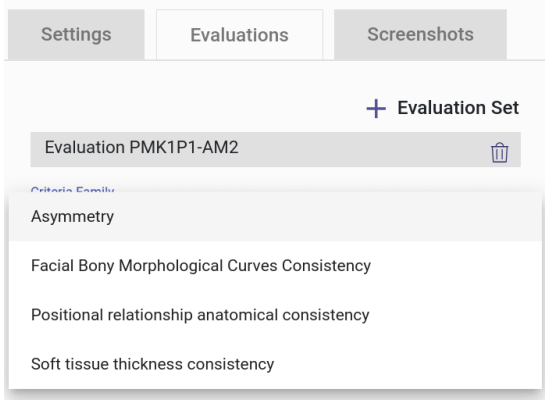 Figure 5. Criteria family selector.
- When selecting family of criteria, the corresponding list of criteria will be displayed where we can assign to each of those that have been evaluated a consistency value between different degrees: strong, moderate, limited, undetermined or not consistent.


Figure 6. Criteria selector within a family (left) and consistency degree selector (right).